1. Introduction
Web QoE Reference Testing Content V 2.0 is licensed under a Creative Commons Attribution 3.0 Austria License.
THIS SOFTWARE IS PROVIDED "AS IS", WITHOUT WARRANTY OF ANY KIND, EXPRESS OR IMPLIED, INCLUDING BUT NOT LIMITED TO THE WARRANTIES OF MERCHANTABILITY, FITNESS FOR A PARTICULAR PURPOSE AND NON-INFRINGEMENT. IN NO EVENT SHALL THE AUTHORS BE LIABLE FOR ANY CLAIM, DAMAGES OR OTHER LIABILITY, WHETHER IN AN ACTION OF CONTRACT, TORT OR OTHERWISE, ARISING FROM, OUT OF OR IN CONNECTION WITH THE SOFTWARE OR THE USE OR OTHER DEALINGS IN THE SOFTWARE.
THIS SOFTWARE IS LICENSED FOR USAGE WITHIN STUDIES AND TRIALS CONDUCTED WITH CLOSED USER GROUPS. IT IS NOT LICENSED FOR USAGE AS PART OF A PUBLICLY ACCESSIBLE ONLINE SERVICE OR WEB SITE.
3. News page
This documentation file should be already placed in the root folder of the application. The harvesting script as well as the news page itself relies on Nette.org PHP framework and it is necessary for page functionality. This framework provides security, proper caching on a server side, efficient calls to the database as well as other server related functionality. This way it is ensured, that the whole application is running fast and responsive, hence the application itself should not introduce any influence to the overall QoE at the end user side.
3.1 Requirements
You will need PHP version 5.2.0 or higher to run Nette Framework. Also, your server will have to comply with required configuration of PHP. The requirements checker is also included in this package, and can by found in checker/checker.php . To check your server compatibility just run the script from your browser by typing url to checker.php script (in example http://example.com/checker/checker.php). Now you will find if your server meets minimal requirements.
Green message with “Congratulations!” is self explaining tells if you can use Nette right away!
3.2 Installation
Installation is very simple: just download and unpack the .zip file into a directory accessible from a web server. After the database have been successfully initialized from provided script, and the application structure have been copied to a web server, you need to configure the application. It should be noted, that the web page itself also contains a "My Social Picture Gallery", which represents a fake Facebook picture gallery. This module needs to be configured separately as described in next section.
3.3 Configuration
The news page module needs to be configured in the app/config/config.neon file. Some preview of the config can be seen here:
Description, how to write and edit a config file in "neon" syntax can be found here.
In this file you can configure database connection, and also image folders relative to www folder - as they have been defined in former section about RSS feeder.here.
The configuration file is very straight-forward, and these variables can be set:
-
page - Basic variables like Name of the page visible in the header of the page. Also number of articles visible on a homepage and category pages can be set here.
-
images - Here you need to set image folders - folder variable holds the images - downloaded for the corresponding articles.
video - Holds the information about videos in the video player. Since the player is relying on HTML5 technology, every video needs to be recorded with both .mp4 and .webm suffixes. Recommendations for the video encoding can be found on Flowplayer.com page.login - Login credentials for the web page (not for Social Gallery).
In case the app/config/config.neon file does not provide necessary changes, it is still possible to change the source code of the application, however it is not recommended if you are not familiar with the Nette framework. If needed, the web page application is located in the app folder. Templates are located in app/templates/ folder. Here you can make changes to the actual HTML code.
In the www/ folder you can also find necessary files like css and javascript sources.
If the framework is running properly, and you encounter configuration error, all the error messages are stored in log/ folder. Going through the error files in this folder, you should be able to find misconfiguration rather easily.
4. My Social Picture Gallery
4.1 Login credentials
This module is to be configured separately. If you do not want to make any changes to the login credentials, you can use a defaults credentials:
- user:
etsi
- password:
testcontent12
If you want to change the configuration anyway, you can do it in this file ( www/fakebook/checklogin.php )
4.2 Setup
To setup the Fakebook site you just need a webserver with PHP enabled.
The website is located in the ZIP file in the folder: Fakebook/website. After extracting the folder it’s necessary to change the unix rights of the images and thumbnails folder to 777 on Linux/Unix or to “full access” on Windows. This is needed to allow PHP to create and alter files (images and XML files for the comments) in these folders.
As the comments are stored in an XML file side by side to the images, by simply deleting all XML files in the images folder all comments are removed from the Fakebook site.
Each folder in images represents an album. All images in the folder are used as album images on the site.
Side note: the average image size on Facebook is 75 KB
4.3 Configuration
The config.php file in the main folder can be used to configure the whole site:
- Amount of columns in the overview and album view
- Dimensions of the thumbnails
- Dimensions of the images/photos
4.4 Parameters
These are the URL parameters that can be used to control the Fakebook behavior:
photo_delay: time until the next photo is shown in photo viewphoto_delay_var: max. deviation from photo_delaythumb_delay: time until the next photo or album thumbnail is shownthumb_delay_var: max. deviation from thumb_delayjumpsize: defines order of the thumbnail loading process
= 0 → thumbnails are loaded right after each other
> 0 → load order is shuffled, thumbnails are skipped
jumpsize_var: max. deviation from jumpsize_var
Example: If photo_delay = 3 and photo_delay_var = 0,5 the final loading time will be between 2,5 and 3,5 seconds for each photo. The parameter photo_delay only works for the photo view, not for the album view!
To configure the album view the paramters thumb_delay and thumb_delay_var are used. The work the same way as the photo_delay* paramters.
The paramters jumpsize and jumpsize_var, define the loading order of the thumbnails in the album view. Higher values mean more shuffling, 0 disables the shuffling.
4.5 Code
The program logic to control the delays is implemented in this Javascript file: www/fakebook/scripts/delayedImageLoader.js.
The PHP file helper_functions.php contains the functionality to create thumbnails and some other small pieces. The rest of the PHP files are used to create the layout and page structure.
4.6 Picture Site
To create picture/photo sites we use Picasa and its “export as html page” features. Some templates don’t provide next and previous buttons. If this is the case for your desired template you might want to adapt it. Here you find a small tutorial on how to do that: http://www.davewilcox.co.nz/toolbox/picasa-customise-templates/
To bring all images to the same file size and resolution it’s recommended to use tools like like IrfanView (also phatch is possible, see http://photobatch.stani.be ):
1) Download and install IrfanView: http://www.irfanview.de/
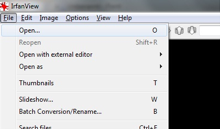
2) Choose File/Open to open and load your image
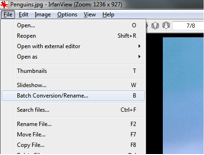
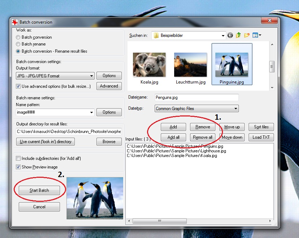
3) Choose File/Batch Conversion/Rename
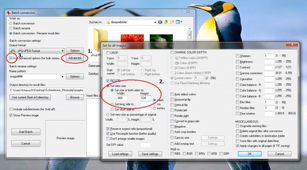
4) Batch conversion settings: Choose „Advanced“ and set picture size to 720 x 480 pixels. Click „OK“ and check „Use advanced options (for bulk resize).
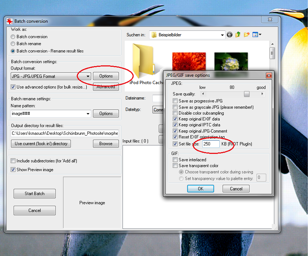
5) Batch conversion settings: Choose „Options“ and set picture size to 250 KB. Click „Ok“.
6) Batch conversion settings: Load all the pictures you want to modify and click „Start Batch“.
In the folder „picture“ there are some sample photopages